
Creating A Fabulous New Bathroom In North Falmouth!
/May 2012 Finds the team from @designREMODEL working on a new bathroom project in North Falmouth. We just completed a kitchen remodel in West Falmouth and we just updated a deck for a long time client also in North Falmouth.
Located across the street from North Falmouth Elementary school, the owners of this Cape house enjoy a transformative first floor bathroom makeover that we completed back in 2009. In the interim we completed other projects as well. In fact, one day this pass winter, I was driving by the house and noticed that the homeowners had some new landscaping done. I sent an email to them complementing them on the work and I got an immediate response: "John, I was just thinking that I needed to contact you this week about getting our second floor bathroom remodeled and there you are in my email box!"
As my clients were very happy with the quality and durability of the fixtures, fittings and finishes in the first bathroom we had remodeled. Because of this, it was a fairly short, yet complete decision process on how the 2nd bathroom was going to be transformed.
Day 1. We completely gutted the entire bathroom down to the wall studs.
Day 2. Taking out the cast iron tub was no easy task. Fortunately it was a straight shot down the stairs and into the demo trailer! We had taken up the top layer of flooring and this allowed us to re-secure the sub floor with screws. We then put down a new lay of 3/4" plywood with lots more screws. We had a number of squeaks, but Bob really made sure he eliminated them! A new wet wall at the end of the tub was built. At this time, we also removed the old window and shifted the framing over about 2' as it was too close to the new tub location. Quirky side note. In opening up the wall, we found that old window framing that had been closed up in the past and thus this was most likely the 3rd time, the window had been relocated in the history of the house!
Day 3. Completed the install of a new Andersen window, then installed new exterior sidewall. Moving inside, we continued to set up for the plumber.
Day 4. The plumbers arrive and quickly set about their work. First, they demolished the old heat and rerouted the heat line under the floor. (This bathroom will have new in-floor radiant heat.) Then they removed and relocated the vent, waste and water lines as the tub and vanity, have switched locations. At the end of the day, we set the new tub into a supporting bed of structural mortar.

Day 5. Around the new tub, we installed blocking for balance bars and padded the walls as needed to allow the cement board to slide down past the tile flange on the tub. Adjustments were made in some of the framing else where in the bathroom and we also installed hurricane clips on the exposed rafters. We also installed a new fan/light fixture over the tub and then went up on the roof to remove shingles and install the fan exhaust port. While up on the roof, we also fixed a leaking, improperly installed pipe flange at the same time.
Day 6. The electrician arrives and removes all of the old wiring in preparation for a completely new rough including new home runs back to the service panel. We had made his job easier by leaving out a section of the flooring and exposing the top of the wall on the wall below. This allowed him to fish new wires or home runs back to the service panel in the basement much faster and easier. This rough-in takes well over 8 hours to complete.
Day 7-8. Plumbing and electrical inspections conducted by the town of Falmouth are completed and passed.
Day 9. We install the newly upgraded insulation as mandated by code in the exterior wall and ceiling.Eladio Gore, Falmouth's Building Commissioner, stops by to sign off on the framing and insulation inspections. After his visit, cement board is installed around the tub and the final prep before the wall board is installed is completed.
Day 10. New plaster board is installed on the walls and ceiling.
Day 11. Plaster is skim coated onto all walls and ceilings and allowed to set.
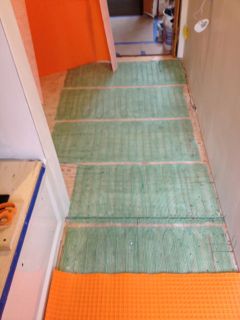
Day 12. Next up is the installation of the in-floor radiant heat. We use a product from Warmly Yours, which makes a heat element woven into mesh. Installation requires you to take your time to plan and then properly install while avoiding damage to the product.
Day 13. Our tile setter John, trowels a layer of thinset over the newly installed heat mat and will allow it set up before returning the next day.
Day 14. Over the thinset and in-floor heat, John now installs a product called Ditra. This is an isolation membrane that is secured with thinset. Ditra provides significant support for the tile while allowing movement by the substrate, thus avoiding grout popping or tile cracking.
Day 15. After setting the tile, John returns one more time to float grout into the joints of his tile install. When mixing the grout, he adds a product called Grout Boost which improves the stain resistance of the grout making it easy to keep the grout clean.
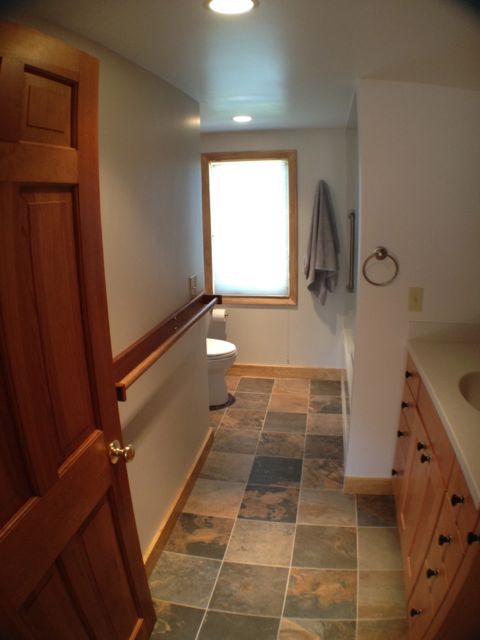
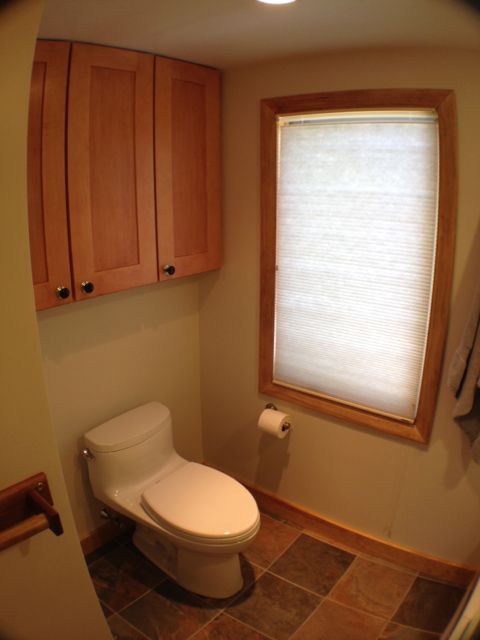
Days 16-20. We are in the home stretch! We start the week by installing a new cherry vanity and linen storage. We also install wall cabinets over the toilet. Then we trim out the window, door and install new baseboard scribed to the tile floor. On the vanity, we install a nice one piece Swanstone counter that has a integrated sink and backsplash.
Around the tub, we install the Swanstone surround on the walls and ceiling. Into the surround, we also install a large storage alcove and balance bars for safety.
Our painter Kemp, from Panda Painting works his magic by prepping, priming and painting the walls and ceiling. He then also stains all of the woodwork and after filling all of the nail holes, applies multiple layers of polyurethane to complete his work.
Meanwhile the plumber Al, has returned to set the toilet, connect all of the waste and water lines, install the vanity faucet and drain, then complete the tub/shower trim.
Right behind Al comes Richard, AKA Sparky, who wraps up the floor heat install by connecting and installing the digital control pad. He then completes the trim out of the recessed lights and installs the sconces over the sink.
Finally, (Are you going whew! yet?) We drill and install the knobs at the vanity, change out the hinges and door knob to the bathroom with all new shiny chrome hardware. (Cape Cod salt air is tough on hardware) Install a new wood threshold at the bathroom entrance.
We also install the Ark Shower panel at the tub. Then our final touch is to do a complete clean up working our way out of the house.
Then we turn the bathroom back over to our clients Lary & Sue Ball who comment, "You've absolutely delighted us once again!"
The following week, we are visited by the town's inspectors who pass the work of our talented trades.
Below are some iPhone pictures of the final result.